DocsGet started
Getting started
The steps below get the blueprint working in your tool and set up your project. For every tool on your machine at once, use the installer under Set up every tool at once.
Install by tool
Claude Code
- Install
claude plugin marketplace add Ninety2UA/agent-blueprint then
claude plugin install agent-blueprint@agent-blueprintThe hooks run as soon as the plugin is on, and Cursor CLI and Amp read this plugin too.
- Set up your project
- in a session
/ab-project-startRun it first in a new project or one you already have; it merges into your files and never overwrites them. What it creates
- Name a skill
/ab-brainstorming/followed by the skill name.- Support
Hooks10 handlers
HelpersSubagents, worktree isolation
Manual-only skillsKept out of the model's list
- Support note
- docs/hosts/claude-code.md on GitHub
Codex
- Install
codex plugin marketplace add Ninety2UA/agent-blueprint then
codex plugin add agent-blueprint@agent-blueprintthen trust the hooks in
/hooks. The Codex app installs the same plugin from its plugin directory.For more on Codex, see Codex in the CLI and the app below.
- Set up your project
- in a session
$ab-project-startCodex offers it right after install.
Run it first in a new project or one you already have; it merges into your files and never overwrites them. What it creates
- Name a skill
$ab-brainstorming$followed by the skill name.- Support
Hooks5 handlers, after you trust them in
/hooksHelpersSubagents, file ownership
Manual-only skillsKept out of the model's list
- Support note
- docs/hosts/codex.md on GitHub
Antigravity
- Install
agy plugin install https://github.com/ Ninety2UA/ agent-blueprint Antigravity needs the full URL and rejects the
owner/form.repo - Set up your project
- in a session
/ab-project-startRun it first in a new project or one you already have; it merges into your files and never overwrites them. What it creates
- Name a skill
/ab-brainstorming/followed by the skill name.- Support
HooksNone
HelpersSubagents, worktree isolation
Manual-only skillsKept out of the model's list (smoke test on 1.2.16)
- Support note
- docs/hosts/antigravity.md on GitHub
Grok Build
- Install
grok plugin install Ninety2UA/agent-blueprint then confirm when it asks. Grok Build needs this command even when Claude Code has the plugin.
- Set up your project
- in a session
/ab-project-startRun it first in a new project or one you already have; it merges into your files and never overwrites them. What it creates
- Name a skill
/ab-brainstorming/followed by the skill name.- Support
HooksNone
HelpersSubagents, worktree isolation
Manual-only skillsKept out of the model's list
- Support note
- docs/hosts/grok-build.md on GitHub
Pi
- Install
pi install git:github.com/Ninety2UA/ agent-blueprint - Set up your project
- in a session
/skill:ab-project-startRun it first in a new project or one you already have; it merges into your files and never overwrites them. What it creates
- Name a skill
/skill:ab-brainstorming/skill:followed by the skill name.- Support
HooksNone
HelpersWith the
pi-subagentspackage; inline without itManual-only skillsKept out of the model's list
- Support note
- docs/hosts/pi.md on GitHub
Cursor CLI
- Install
Cursor CLI reads Claude Code's plugin, so once Claude Code has it there is nothing to do. To add it there:
claude plugin marketplace add Ninety2UA/agent-blueprint then
claude plugin install agent-blueprint@agent-blueprintWithout Claude Code:
cursor-agent plugin marketplace add https://github.com/ Ninety2UA/ agent-blueprint then run
/pluginin a session and install agent-blueprint.- Set up your project
- in a session
/ab-project-startRun it first in a new project or one you already have; it merges into your files and never overwrites them. What it creates
- Name a skill
/ab-brainstorming/followed by the skill name.- Support
HooksNone
HelpersSubagents, worktree isolation
Manual-only skillsKept out of the model's list
- Support note
- docs/hosts/cursor-cli.md on GitHub
Hermes
- Install
The installer gives Hermes its own copy in
~/, a folder only Hermes reads, with no config to edit:.hermes/ skills git clone https://github.com/ Ninety2UA/ agent-blueprint.git && bash agent-blueprint/ install.sh --only hermes - Set up your project
- in a session
/ab-project-startRun it first in a new project or one you already have; it merges into your files and never overwrites them. What it creates
- Name a skill
/ab-brainstorming/followed by the skill name.- Support
HooksNone
HelpersSubagents (
delegate_task), two per one-shot runManual-only skillsCannot be enforced
- Support note
- docs/hosts/hermes.md on GitHub
Amp
- Install
Amp reads Claude Code's plugin, so once Claude Code has it there is nothing to do. To add it there:
claude plugin marketplace add Ninety2UA/agent-blueprint then
claude plugin install agent-blueprint@agent-blueprintWithout Claude Code:
git clone https://github.com/ Ninety2UA/ agent-blueprint.git && bash agent-blueprint/ install.sh --only amp which writes a copy in
~/that only Amp reads..config/ amp/ skills - Set up your project
Ask in plain words: "use the ab-project-start skill".
Run it first in a new project or one you already have; it merges into your files and never overwrites them. What it creates
- Name a skill
Ask in plain words: "use the ab-brainstorming skill".
- Support
HooksNone
HelpersSubagents, file ownership
Manual-only skillsCannot be enforced
- Support note
- docs/hosts/amp.md on GitHub
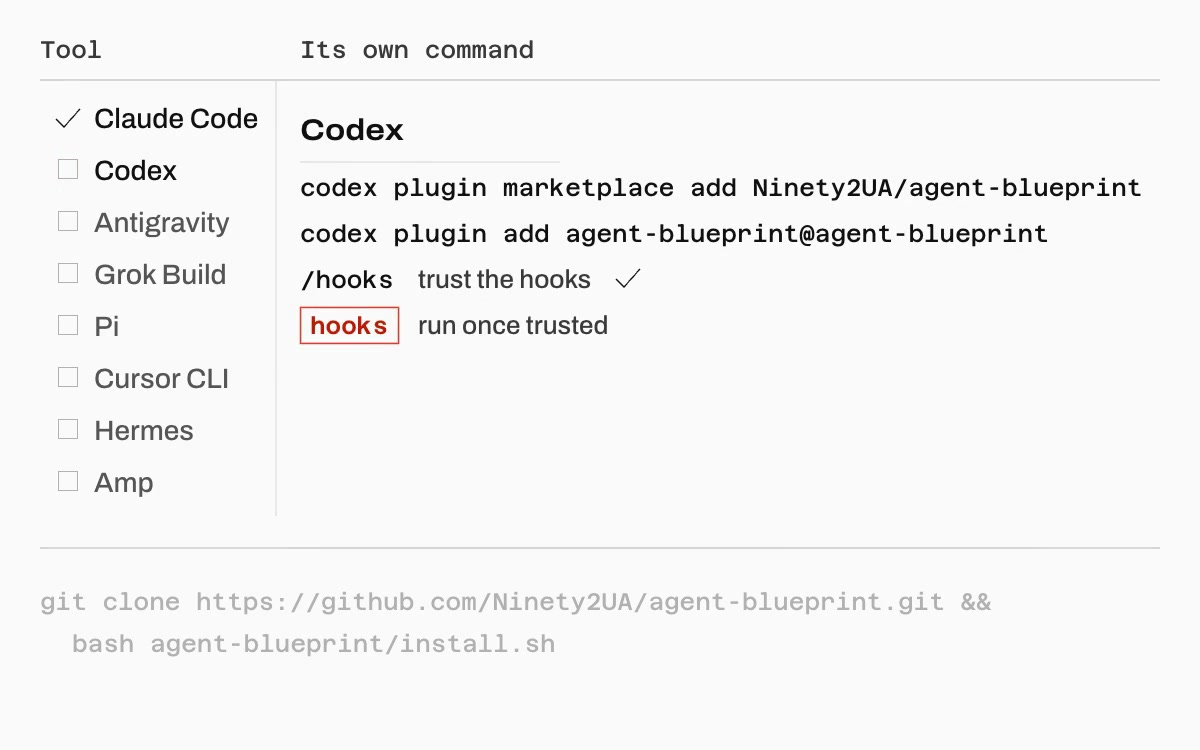
Each tool installs Agent Blueprint from GitHub by its own route and updates it the same way. Find your tool in the table, or set up every tool on the machine at once with the installer.
Hosted
Agent Blueprint also runs as a hosted agent, built on Vercel’s Eve framework, that you deploy to your own Vercel account, Railway or a server you run. It reads the same skills as the coding CLIs. You reach it from a web chat, Slack, Linear, Telegram, an MCP client such as Claude Code, or HTTP, name a GitHub repository and a feature, and it works through the same pipeline to a reviewed pull request. It pushes as a GitHub App you create for that one repository, so it can reach no other. Helpers run on the model their role is given through the Vercel AI Gateway, and the shell runs in a sandbox: Vercel Sandbox, Docker or Daytona.
It is not one of the eight tools below and nothing installs on your computer, so install.sh does not set it up. You pay for the model use through the AI Gateway and for the sandbox time where you run it.
- The Hosted page builds a deploy link from your choices: where it runs, the sandbox, the channel and how it reaches the AI Gateway.
eve/lists what to have ready, the three deploy routes, the variables and how to upgrade a running copy.README.md docs/says what works differently there, including the skills that are limited.hosts/ eve.md
Install in your tool
Each tool's route is in the install tabs above, with a copy button for every command.
Give each tool one route, because a tool that sees the skills twice lists every skill twice. Cursor CLI and Amp read Claude Code’s plugin, so once Claude Code has it they need nothing more. Grok Build loads no skills from Claude Code’s plugin and needs its own command even then. If you installed 4.0, run the installer below once without --only. It installs each tool by its own route, then removes the copies 4.0 recorded in ~/, ~/ and ~/.
Codex in the CLI and the app
In the Codex CLI:
-
Add the marketplace:
codex plugin marketplace add Ninety2UA/agent-blueprint -
Add the plugin:
codex plugin add agent-blueprint@agent-blueprint -
Start a Codex session, run
/hooksand trust the Agent Blueprint hooks. Codex runs none of them until you do, and every skill works without them.
In the Codex app, add the same marketplace and plugin from the app’s plugin directory, then trust the hooks in /hooks.
The hooks add five checks: a pointer to docs/ when a session starts, the prompt-injection guard on file writes (it reads Codex’s apply_patch edits too), the commit-message check (on when .agent-blueprint/ sets hooks.validateCommit), a context monitor that warns at 150 tool calls, and the Stop guard that keeps an interactive ab-ship-pipeline run going while its state file says running.
Right after the install, Codex offers $ab-project-start, the setup skill described under Set up your project. Codex’s $ picker shows a display name and a one-line description for every skill, such as Project Setup for ab-project-start and Brainstorming for ab-brainstorming. Two skills, ab-plugin-update and ab-migrate, stay manual-only, so Codex runs them only when you type their name.
To update, run codex plugin marketplace upgrade agent-blueprint, then codex plugin add agent-blueprint@agent-blueprint again. Codex keeps each version in its own cache folder, so the second command is the one that switches to the new release.
Set up every tool at once
The installer finds the tools on your PATH and runs the route from the table for each one, with GitHub as the source:
git clone https://github.com/Ninety2UA/agent-blueprint.git
bash agent-blueprint/install.sh
It adds --trust to Grok Build’s install so Grok does not stop to ask. For Cursor CLI without Claude Code, it adds the marketplace and lists /plugin as the step left for you, because a script cannot run it. When Claude Code’s plugin covers Cursor, it leaves Cursor’s marketplace alone, because Cursor shares it with every computer signed in to your account. If it had added that marketplace on this computer before, it tells you to uninstall Cursor’s own copy in /plugin, where Claude Code’s copy is marked “(Claude Code)”. Without Claude Code’s plugin, a marketplace that points somewhere other than GitHub, such as a local checkout or a fork, stays as it is too, and the installer prints the two commands that switch it to GitHub. It writes no shared ~/ copy, removes the copies an earlier version recorded, and ends by pointing you to the setup skill.
The installer needs python3, which it uses to read each tool’s install records. If one tool’s install fails, it still installs the others, then lists which tools finished and which failed and exits with an error. For each failed tool it says whether its current install stayed or had already been removed, so you know to run the installer again. Before it removes an install to replace it from GitHub, it checks that GitHub answers, so a dropped connection leaves the old install in place. Stopping it with Ctrl-C stops the whole run.
In the clone, install.sh takes these options:
bash install.sh --dry-run                    # print what would run or be copied, change nothing
bash install.sh --only claude,codex          # only these tools (claude,codex,agy,grok,pi,cursor-agent,hermes,amp)
bash install.sh --local                      # install from this clone instead of GitHub (use a clean clone or worktree)
bash install.sh /path/to/project             # install, then scaffold that project
bash install.sh --scaffold /path/to/project  # only scaffold a project's files
bash install.sh --copy-dir /path/to/skills   # copy the skills somewhere else, for a machine with no tool on PATH
Check that your tool sees the skills
Start a session and ask which skills it has that start with ab-. You should see each of them once; the support note for your tool names its own listing command. Two skills, ab-plugin-update and ab-migrate, are manual-only and stay out of that list on purpose: they run only when you name them. In Codex you can also type $ to open the skill picker, which shows each skill by its display name, such as Project Setup.
Set up your project
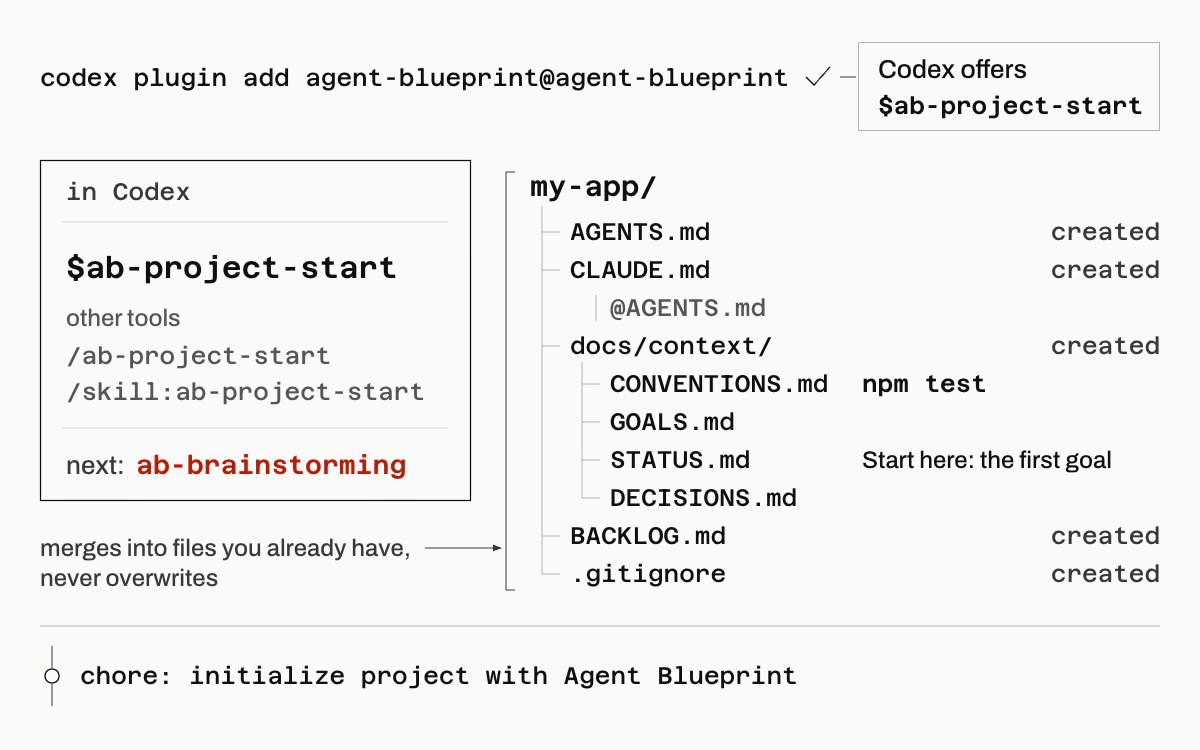
ab-project-start sets up a projectRun the setup skill, ab-project-start, first thing in a new project, or when you add the blueprint to a project that already exists. Start it with /ab-project-start in Claude Code, Antigravity, Grok Build, Cursor CLI and Hermes; Claude Code’s menu also lists it as /agent-blueprint:ab-project-start. In Codex it is $ab-project-start, and Codex offers it right after you install the plugin. In Pi it is /skill:ab-project-start, and in Amp you ask in plain words: “use the ab-project-start skill”.
It creates AGENTS.md, the instructions every tool reads, with a one-line CLAUDE.md that imports it for Claude Code. Next to them go docs/ (CONVENTIONS.md, GOALS.md, STATUS.md and DECISIONS.md), a BACKLOG.md, and .gitignore lines that keep its working files out of commits. The skill merges into files you already have and never overwrites them, then fills in your commands, goals and status from the code and a short conversation. What you get shows the whole layout.
Open the session in the project folder. With no folder named, the skill refuses to run in your home folder or in /. In a folder that has files but is not a git repository, it shows what it would write and asks first. Inside a git repository it never runs git init again, names the repository’s top folder, and commits nothing, so you can review the changes.
Name a skill when you want a specific one
Every tool also picks a skill on its own when your request matches its description.
How to name a skill in each tool is in the install tabs above.
The setup skill is named the same way, as Set up your project shows for each tool.
What each tool supports:
In the install tabs above, under Support.